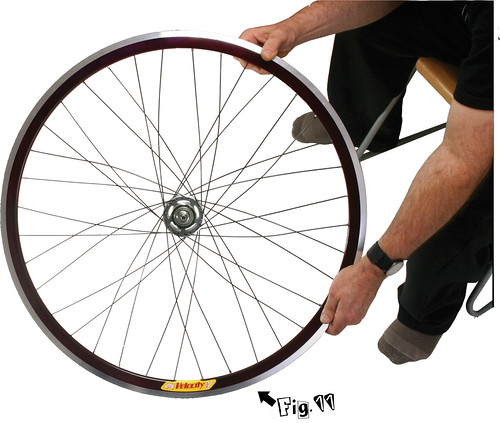
page 28-34, Issue #5
-words by Charles Hadrann
-photography by Hotte Kiessling
I’ve built thousands of bicycle wheels since 1972, it’s time to take the wheel “craft” to a new level. A few years ago I wanted to build some bombproof cyclecross wheels for a newbie. The method I used is called double, and sometimes triple, lacing.
Lacing is a spoke pattern where spokes touch in a weaving fashion as they cross each other. Lacing not only gives lateral strength—or side load strength—any “shock” given to a spoke by hitting potholes and other bad road conditions, will disperse at the lacing “connection”.
This wheel build will be a 4-cross double-laced fixie set.
MATERIALS
– Velocity Deep-V Rim
– Black DT Spokes
– Flip-Flop Track Hub
I ONLY use D.T. spokes with the box marked with an R2 in the far right corner of the spoke size label. One of my favorite rims is the Velocity Deep-V, which can be bought in a variety of colors and spoke holes. These rims are consistent in their heat-treated quality, and they true and round nicely.
WORDS OF WARNING! Do not use any spokes with long 90-degree bends. It seems all spoke manufacturers made this mistake at some point and the consumer suffers by recurring spoke breakage at the hub flange. The bend of the spoke should not have a noticeable gap at the flange.
The rule is: “If you break three spokes, it’s time for a rebuild”.
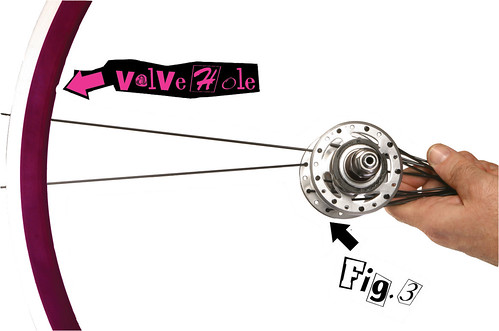
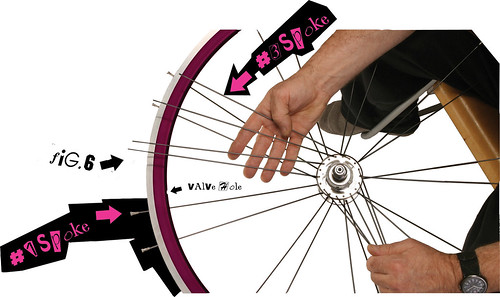
All modern rims have off-set/off-center hole drillings. With the rim laying flat/horizontal in your lap and the valve farthest away from you, the spoke hole to the left of the valve is an “up” hole. Sometimes referred as ‘European’ hole drilling, this is the most common hole pattern on modern rims. This is where to start and end the wheel build.
I put in all the number 1’s and 2’s at the same time, these will be my inside spokes, with the bend of the spoke on the inside part of the hub flange.
The number 3’s are installed next, with the hub being twisted counter-clockwise. The number 4’s are installed and follow the pattern of the 3’s. The 3’s and 4’s are the outside spokes.
Always install the inside spokes first, it will make lacing the last set of spokes easier.
I use a purple thread-locker on the threads of the spokes. This keeps the nipples secure and reduces the nipples from unscrewing due to compression. It also greatly reduces corrosion due to dissimilar metals by acting as a barrier.
Almost all nipples are nickel-plated brass and have a tendency to unscrew from a stainless spoke when compressed. This compression happens when the wheel torques in pedaling, under load, and when the brakes are engaged.
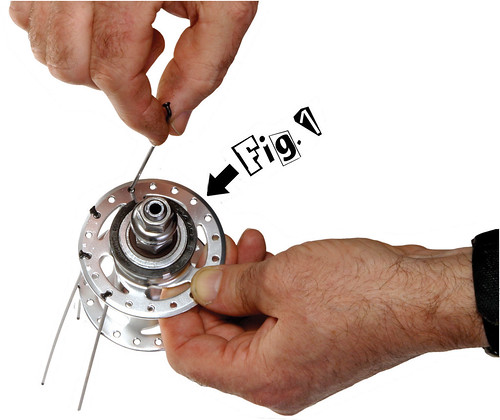
STEP 1
While holding the flange of the hub that is closest to me, I drop a spoke into any spoke hole. Once I do this, I am committed to a pattern. This first spoke is the number 1 spoke which is also an inside spoke, with the bend of the spoke on the inside part of the flange.
I install all the number 1 spokes in every other spoke hole on the flange.
STEP 2
Holding a number 1 spoke with the flange closest to me, I look to the spoke holes on the opposite flange. These holes are not directly across from my number 1 spoke they are offset drilled. Looking at the number 1 spoke, I take a number 2 spoke and install it in the hole, which is left of the number 1. The number 2 is also an inside spoke, with the bend to the inside.

Now I repeat by installing all the number 2’s in every other hole of the flange.
WORDS OF WARNING! If you flip the hub flange so that the number 1 spoke and its flange is away from you, with the “empty” flange closest to you, the number 2 spoke will be put in the wrong hole. This results in the number 2’s being too long and the number 1’s being too short.
STEP 3
Using the valve hole as the point of reference, I install the number 1 spoke to the left of the valve hole, the “up” hole, twisting the nipple on just far enough so the nipple does not fall off during the rest of the wheel build. Install the number 2 spoke, just to the left of the number 1 spoke already installed.
Skip two holes on the rim and repeat installing the number 1’s and 2’s in the same pattern. Install all the number 1’s and 2’s, making sure there are two empty holes at the rim between spokes.
DO NOT screw the nipple on very far, three or four complete turns will do. If you screw the nipples on too far as you are beginning, the last set of spokes will not reach the nipples.
I check my work. The number 1 spoke is left of the valve, with the number 2 left of the number one. I skipped two holes to the left and installed another number 1 with a number 2 to the left. I make sure I didn’t get distracted and install a number 2 where a number 1 belongs.
That would be a problem.
STEP 4
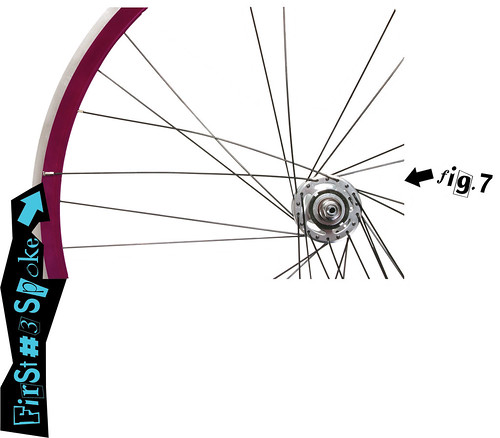
Flipping the wheel over so the number 1 side of the flange is “down” in my lap, I drop the number 3 spoke in the same side of the flange where the number 1 is. This is an outside spoke, with the bend of the spoke to the outside. The number 3 will be used to start the lacing pattern.
Lifting the rim up slowly and holding it vertical so the number 3 spokes can lay flat on the hub, preventing the spokes from falling out, I then lay the rim in my lap with the number 1’s and 3’s facing me.
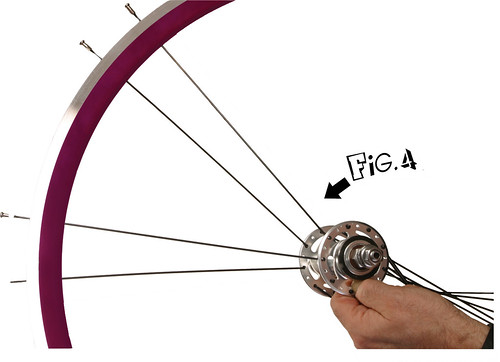
STEP 5
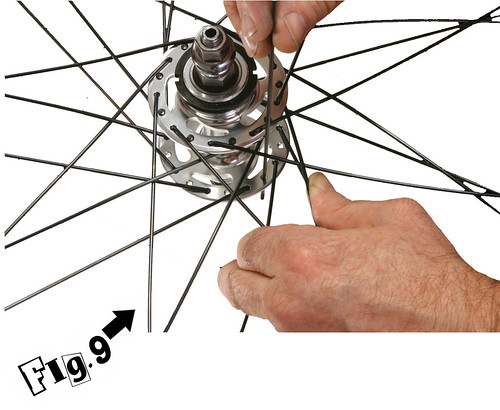
Using the number 1 spoke at the valve hole as a point of reference, I count to the right of the number 1 at the hub to the fourth loose spoke just installed. This spoke is going to be the lead spoke for the double-laced pattern.
The objective is to rotate the hub counter-clockwise, or to the left direction, so the number 3 spokes will cross over 4 spokes. Hence, a four-crossed spoke pattern. Taking the fourth loose spoke to the right of the #1, I rotate the hub to the left and start weaving the spoke over two and under one.
At this point I stop and do not continue to weave over the last spoke that would have to be crossed to achieve a four cross pattern.
DO NOT INSTALL THIS FIRST NUMBER THREE SPOKE INTO THE RIM.
The reason I don’t attach this first of the number 3’s is because it makes it easier to weave the last non-woven spoke. I screw a nipple on this first #3 spoke so as not to scratch the rim with the threads of the spoke, and continue to work clock-wise installing all the #3 spokes.
Over two, under one, over one, and attach the spoke to the rim next to the number 2 spoke. I’m working in a clock-wise direction and grabbing the next number 3 and weaving it to the left, over two, under one, and over one.
Just screw the nipple on a few complete turns, threads should still be showing at this time.
Install all the number 3’s, including the first lead spoke. By the time you work your way around the rim lacing your #3’s, it will become apparent why you didn’t install that lead #3 spoke in the beginning!

Make sure the number 1,2, and, 3 spokes are attached to the rim correctly in sequence, and look at every number 3 and make sure it is woven over two, under one, and over one.
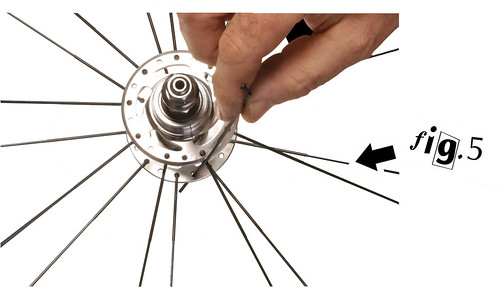
STEP 6
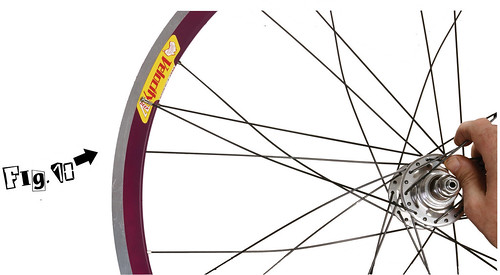
With the newly laced wheel still facing me, I drop the last set of spokes into the hub flange, which is “down”. This number 4 spoke is also an outside spoke, with the bend to the outside of the hub flange.
Lifting the wheel slowly so that it is in an upright/vertical position, I let the spokes fall flat on the hub flange. Laying the wheel in my lap, I can now install the last set of spokes.
At this stage in the wheel build, I can take any of the number 4 spokes and start lacing because the lacing pattern is already set on the other side of the wheel. All I have to do is take the first number 4 spoke and cross over two and under one, pausing to screw on a nipple without attaching the spoke to the rim.
This is the lead spoke for the double-lace that goes in last; allowing the next to last spoke to weave easily, refer to ‘trick of the trade’.
From the lead spoke move in a counter clock-wise direction and weave the number 4’s in to the right. Over two, under one, over one, and attach the spokes at the rim. Keep installing the spokes counter clock-wise until the lead spoke and then install it to the rim.
I look at every #4 spoke and make sure they are all double laced, over two, under one, and over one.
Have your local bike shop check your work.
If they have questions about the double lacing pattern, have them read the full text of this article online at www.crankedmag.com or www.wrightbrotherscycleworks.com.
Wheel building classes are available at Wright Bros. Cycle Works. Check our website or call 206 633 5132 for current class schedule.
Get Part 2 of the Hadrann Wheelcraft Method “The Build” in the next issue of Cranked. (soon)

3 thoughts on “Hadrann Wheelcraft Method – Part 1 Lacing”